---
title: "Building and Debugging a Workflow"
canonical: https://trickest.com/docs/using-the-app/workflow-and-executions/building-and-debugging-a-workflow
description: "Configure and test one node, inspect its output, connect another node, and run the workflow."
---
# Building and Debugging a Workflow
Build a workflow one step at a time. Test a node with a small input, check what it produced, then connect the next step. A completed run tells you execution finished; inspecting the output tells you whether it did what you intended.
## Before you start
Open an editable workflow, or [copy one from the Library](./using-workflows-from-the-library). You need permission to edit and run it, plus an available execution fleet. On Community, [connect a self-hosted machine](../private-execution-networking/using-self-hosted-machines) before running nodes.
This example connects **Subfinder v2.8.0** to **dnsx v1.2.2**: discover subdomains, then resolve their DNS records. The screenshots use `trickest.com` to illustrate the configuration; replace it with a domain you are authorized to test. They show configuration, not a completed execution. Input names and output formats can differ in other tool versions.
The example nodes are named **Find subdomains** and **Resolve DNS**. These are optional labels: double-click a node's name to rename it without changing its tool.
## 1. Add a Node on the Canvas
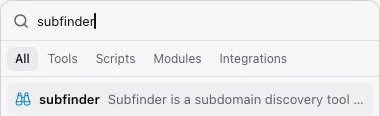
Select **Add node (+)** in the bottom canvas toolbar. Search for the tool you need, such as `subfinder`.
Select the result to add a node. Open that node to configure it before running it.
 A tool packages a command-line program. A [script](/docs/key-concepts/building-blocks/scripts) runs code you provide; a [module](/docs/key-concepts/building-blocks/modules) contains a reusable workflow. Choose the building block that fits the step.
## 2. Configure and Run a Single Node
Select the node and choose **Open node** from its floating controls, or double-click its body. Double-clicking the name renames it. If its input panel is hidden, select **Show inputs**. Read each input's description and supply the values or files your task needs.
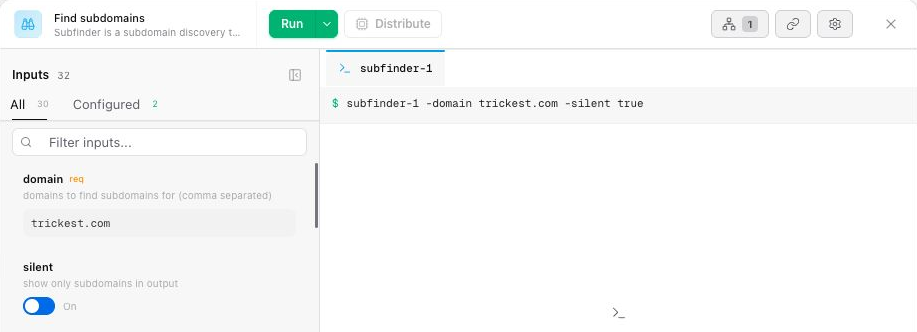
For **Subfinder v2.8.0**, set **domain** to your target domain and enable **silent** for output containing discovered names. The screenshot uses `trickest.com`. Review the generated command and any validation messages before running.
Select **Run** in the node controls (**Run ×N** for a distributed node). This tests the selected node and may run upstream dependencies if their results cannot be reused. **Run with downstream nodes**, when available in the adjacent menu, also runs the steps connected after it.
A tool packages a command-line program. A [script](/docs/key-concepts/building-blocks/scripts) runs code you provide; a [module](/docs/key-concepts/building-blocks/modules) contains a reusable workflow. Choose the building block that fits the step.
## 2. Configure and Run a Single Node
Select the node and choose **Open node** from its floating controls, or double-click its body. Double-clicking the name renames it. If its input panel is hidden, select **Show inputs**. Read each input's description and supply the values or files your task needs.
For **Subfinder v2.8.0**, set **domain** to your target domain and enable **silent** for output containing discovered names. The screenshot uses `trickest.com`. Review the generated command and any validation messages before running.
Select **Run** in the node controls (**Run ×N** for a distributed node). This tests the selected node and may run upstream dependencies if their results cannot be reused. **Run with downstream nodes**, when available in the adjacent menu, also runs the steps connected after it.
 For file inputs, provide a file or connect an upstream output that matches the input's expected format. Flags enable options; text and numeric inputs supply values. Follow the descriptions shown for your node rather than filling every optional input.
If you opened a historical run, its configuration is read-only. Select **Edit workflow** in the header run chip before making changes. Viewing a run and editing the workflow are separate actions.
## 3. Validate Results and Iterate
Inspect both the execution status and the resulting data.
For an ordinary tool node, the console tab may use the tool's name, such as **subfinder**. Read its command output and diagnostic messages. Select **Show files** if the file tree is hidden, then open a file under **Outputs** to preview its contents. **Inputs** contains the files supplied to the node.
For a distributed node, select a task in the task sidebar, then use **Console** or **Files** to inspect that task. Check the output you intend to pass to the next node, including its contents and format.
For this connection, inspect the Subfinder output for plain hostnames, one per line, so dnsx can read them as a host list. Check the actual file after running; the screenshots do not demonstrate an output. Discovery can return no matches, and no particular hostname or result count is guaranteed.
| What you see | What to check next |
| --- | --- |
| The node has not started | Check run status and whether the selected fleet has an available machine. |
| The task failed | Read the console for the reported error, then check the relevant input or configuration. |
| The task completed but output is empty | Check whether the input and selected options should produce matches. Empty output is not enough to diagnose a failure. |
| Output exists but has the wrong format | Check the tool's output options before connecting it to a downstream input. |
Change one relevant setting, run the node again, and compare the result. This keeps a configuration change separate from a change in input data.
## 4. Add and Connect a Downstream Node
Open **Add node** and add `dnsx`. The example uses **dnsx v1.2.2**, labelled **Resolve DNS**.
Drag from the first node's output handle to the next node's input handle. The receiving node opens with **Choose which parameter receives the output**. Select the input that accepts the output you want to pass.
For **dnsx v1.2.2**, choose **list**, described as “list of sub(domains)/hosts to resolve (file or stdin)”. Open **Resolve DNS** and confirm that **list** shows the connected **Find subdomains** node. Check the input description again if you use another version.
Configure any other inputs the receiving node needs, then run it and inspect its console and output files. If the upstream output is missing, run the upstream node first.
For file inputs, provide a file or connect an upstream output that matches the input's expected format. Flags enable options; text and numeric inputs supply values. Follow the descriptions shown for your node rather than filling every optional input.
If you opened a historical run, its configuration is read-only. Select **Edit workflow** in the header run chip before making changes. Viewing a run and editing the workflow are separate actions.
## 3. Validate Results and Iterate
Inspect both the execution status and the resulting data.
For an ordinary tool node, the console tab may use the tool's name, such as **subfinder**. Read its command output and diagnostic messages. Select **Show files** if the file tree is hidden, then open a file under **Outputs** to preview its contents. **Inputs** contains the files supplied to the node.
For a distributed node, select a task in the task sidebar, then use **Console** or **Files** to inspect that task. Check the output you intend to pass to the next node, including its contents and format.
For this connection, inspect the Subfinder output for plain hostnames, one per line, so dnsx can read them as a host list. Check the actual file after running; the screenshots do not demonstrate an output. Discovery can return no matches, and no particular hostname or result count is guaranteed.
| What you see | What to check next |
| --- | --- |
| The node has not started | Check run status and whether the selected fleet has an available machine. |
| The task failed | Read the console for the reported error, then check the relevant input or configuration. |
| The task completed but output is empty | Check whether the input and selected options should produce matches. Empty output is not enough to diagnose a failure. |
| Output exists but has the wrong format | Check the tool's output options before connecting it to a downstream input. |
Change one relevant setting, run the node again, and compare the result. This keeps a configuration change separate from a change in input data.
## 4. Add and Connect a Downstream Node
Open **Add node** and add `dnsx`. The example uses **dnsx v1.2.2**, labelled **Resolve DNS**.
Drag from the first node's output handle to the next node's input handle. The receiving node opens with **Choose which parameter receives the output**. Select the input that accepts the output you want to pass.
For **dnsx v1.2.2**, choose **list**, described as “list of sub(domains)/hosts to resolve (file or stdin)”. Open **Resolve DNS** and confirm that **list** shows the connected **Find subdomains** node. Check the input description again if you use another version.
Configure any other inputs the receiving node needs, then run it and inspect its console and output files. If the upstream output is missing, run the upstream node first.
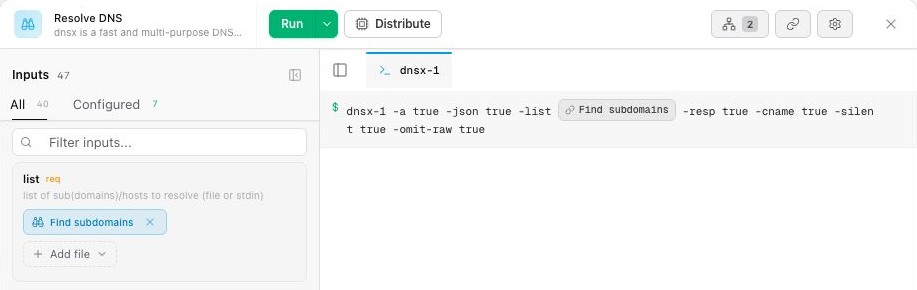 A connection supplies data to a specific input. It does not configure the receiving tool's other options. This example also enables **a**, **cname**, **json**, **omit-raw**, **resp**, and **silent** in dnsx. Review their descriptions and choose the DNS queries and output format your task needs.
## 5. Continue Building
When both steps produce the data you expect, return to the canvas and use **Execute** to run the workflow. Review the resulting run to confirm the connected steps work together.
[Executing and Scheduling Workflows](./executing-and-scheduling-workflows) explains execution options, fleet selection, and recurring runs. [Working with Runs](./working-with-runs) explains statuses and how to inspect previous executions.
Add further nodes using the same cycle: configure, run, inspect, then connect. Test a small input before increasing the workload or [distributing jobs](./distributing-and-scaling-jobs).
## 6. Restore a Past Run's Version
Restore replaces the live workflow definition with the version recorded for a previous run. Use it when you want to return to that configuration, rather than only inspect its results.
Open the workflow's run history and select the run whose workflow version you want to restore.
Inspect the recorded configuration. For an eligible earlier version, select **Restore** in the header run chip, or **Restore this version…** in **Workflow actions**.
Read **Restore to this version?** before selecting **Restore**. Cancel if you want to keep the current workflow.
A connection supplies data to a specific input. It does not configure the receiving tool's other options. This example also enables **a**, **cname**, **json**, **omit-raw**, **resp**, and **silent** in dnsx. Review their descriptions and choose the DNS queries and output format your task needs.
## 5. Continue Building
When both steps produce the data you expect, return to the canvas and use **Execute** to run the workflow. Review the resulting run to confirm the connected steps work together.
[Executing and Scheduling Workflows](./executing-and-scheduling-workflows) explains execution options, fleet selection, and recurring runs. [Working with Runs](./working-with-runs) explains statuses and how to inspect previous executions.
Add further nodes using the same cycle: configure, run, inspect, then connect. Test a small input before increasing the workload or [distributing jobs](./distributing-and-scaling-jobs).
## 6. Restore a Past Run's Version
Restore replaces the live workflow definition with the version recorded for a previous run. Use it when you want to return to that configuration, rather than only inspect its results.
Open the workflow's run history and select the run whose workflow version you want to restore.
Inspect the recorded configuration. For an eligible earlier version, select **Restore** in the header run chip, or **Restore this version…** in **Workflow actions**.
Read **Restore to this version?** before selecting **Restore**. Cancel if you want to keep the current workflow.
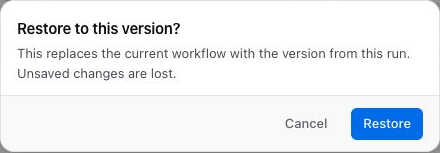 Restore replaces the current workflow definition and discards unsaved changes. Keep a separate copy of changes you want to preserve before confirming.
Restore requires write access and a run whose workflow differs from the current version. Moving nodes alone does not make a run eligible. Other workflow states, such as a scheduled workflow or active agent generation, can also make restoration unavailable.
Restore does not start a new run. Review the restored workflow's inputs before executing it.
---
_Markdown source of https://trickest.com/docs/using-the-app/workflow-and-executions/building-and-debugging-a-workflow._
Restore replaces the current workflow definition and discards unsaved changes. Keep a separate copy of changes you want to preserve before confirming.
Restore requires write access and a run whose workflow differs from the current version. Moving nodes alone does not make a run eligible. Other workflow states, such as a scheduled workflow or active agent generation, can also make restoration unavailable.
Restore does not start a new run. Review the restored workflow's inputs before executing it.
---
_Markdown source of https://trickest.com/docs/using-the-app/workflow-and-executions/building-and-debugging-a-workflow._